Showing posts with label Sleek MakeUP. Show all posts

Monday, December 20, 2010

All About Eyes - Peach & Purple For The Holidays


Products Used:
Sleek MakeUP i-Divine Palette - Circus (metallic purple) & Storm (metallic grey) 
MAC Eyeshadow - Paradisco
Annabelle Cosmetics Hype Liquid Liner - Mystic Black
MAC Fluidline - Blacktrack
Tarte Lights, Camera, Splashes! Mascara - Black


This is probably one of my favourite looks I've created so far, I absolutely love how it turned out! To start off, I applied the metallic purple eyeshadow all over the lid up to the brow bone, but leaving the inner third free of product. Then I applied the metallic grey colour in the inner corner and blended it into the purple shade. Next, I used a blending brush to apply Paradisco along the brow bone from the inner corner all the way to the outer edge, then applied the purple eyeshadow on the lower lash line. Lastly, I lined my upper lash line with Mystic Black liquid liner, lined the lower lash line with Blacktrack, filled in my brows with matte black eyeshadow and applied a few coats of mascara to both upper and lower lashes.

I think this is a great look for the holidays because it's fun and colourful, but still quite wearable and appropriate for most functions. 


Hope you guys like this look!


READ MORE - All About Eyes - Peach & Purple For The Holidays

Thursday, December 16, 2010

All About Eyes - Evening Neutral


Products Used:
Sleek MakeUP i-Divine Palettes - Storm (champagne, brown & maroon) 
and Sunset (burnt orange & pinky gold)
MAC Eye Pencil - Coffee
Clinique High Impact Mascara - Black


This entire look came about simply because I wanted to use the gorgeous, metallic brown shade from Sleek's Storm palette. I was taking a look through all my palettes for inspiration and realized I've never used it before! Strange, I thought. 

Anyway, I started off by applying said eyeshadow on my eyelid, from lash line to just above the crease, making sure to leave the inner third of my eye free of product. Then I applied a pinky gold colour on the inner corner, blending it nicely with the metallic brown. This shade (very right on the swatch photo) is kind of interesting: it looks pink in the pan and when placed on the skin, but it has some gold shimmer running through and the gold becomes more pronounced as you blend away. It's quite pretty, actually! Next up, I used a burnt orange shade and used it to blend the upper edge of the eyeshadow to create a smokier effect. The maroon shade was then applied to the outer corner of the eyelid to create a bit more depth; this shadow was also used to line the lower lash line. 

Last were the finishing touches: a lovely, shimmery champagne colour to highlight the brow bone, a matte black eyeshadow to define the brows a bit more, MAC's coffee eye pencil to line both upper and lower water lines, and a few coats of High Impact Mascara on both the top and bottom lashes.


Hope you like this look :)


READ MORE - All About Eyes - Evening Neutral

Monday, December 13, 2010

All About Eyes - Winter Ice


Products Used:
Annabelle Cosmetics Smudgeliner - Foxy Grey
Sephora Collection Eyeshadow - Aspen Summit 23
Sleek MakeUP i-Divine Palette - Circus (pale, sky blue)
Annabelle Cosmetics Liquid Liner - Mystic Black
CoverGirl VolumeExact Mascara - Very Black


Something a bit less wearable for you lovelies today... There was a week in November where we experienced below 0 temperature. there was snow, ice everywhere; it was freezing. It kind of inspired me to create an icey look.

I started off by applying Foxy Grey Smudgeliner (which is actually silver) on the eyelid, ending just above the crease. Then I used Aspen Summit, a shimmery white eyeshadow and applied it all over the lid and up to the brow bone. Because I had a silver base, there will be a difference in shade, despite using the same eyeshadow. Next, I applied a sky blue eyeshadow just on the outer corner of the eye. Then with Annabelle's Mystic Black eyeliner, I applied a thin line on my upper lash line. Lastly, I applied Foxy Grey on the lower lash line, applied a few coats of mascara (I really don't recommend VolumeExact, I'm just trying to use it up :p), and filled in any gaps in my eyebrows with a matte black eyeshadow.


Hope you like this look!
Happy Monday :)


READ MORE - All About Eyes - Winter Ice

Monday, December 6, 2010

All About Eyes - Black & Gold (Inspired by Natasha Bedingfield)

When I first saw Natasha Bedingfield's video for her new single, Strip Me, I was blown away by all the makeup looks (there are around 8 or 9) and how beautiful they all were. There was one look in particular that this was inspired by: a black and gold smoky eye. So I decided to do my own take on the look.


Products Used:
Annabelle Cosmetics Smudgeliner - Honey
Sleek Makeup i-Divine Palette - Storm
MAC Fluidline - Blacktrack
L'oréal Voluminous Mascara - Black

Firstly, I applied Annabelle's Honey Smudgeliner all over the lid, from the lash line to the brow bone and then I layered the gold eyeshadow on top. Next, I applied the matte black eyeshadow to the outer half of the eyelid, making sure to taper the outer edge off. I also applied this to the lower lash line (keeping the inner corner free of black eyeshadow) and used it to fill in the gaps in my eyebrows. Then I lined the upper lash line & my lower water line with Blacktrack and applied two coats of mascara to both top & bottom lashes. Simple, right?


Hope you like this look :).
Happy Monday!


READ MORE - All About Eyes - Black & Gold (Inspired by Natasha Bedingfield)

Wednesday, December 1, 2010

Monthly Favourites - November 2010


In every Monthly Favourites post, I always say something along the lines of, "I can't believe it's ___ already!" or "Time is going by so fast!" Seeing as I would hate to break tradition, I have to say: November really really flew by for me. But I'm so happy it's December, because it means Christmas is right around the corner! But enough blabbering from me, here's my November Faves:


1. Revlon - Beyond Natural Skin Matching Makeup


I wasn't too jazzed about this foundation at first. I didn't feel there was enough coverage and I didn't really like the finish. But once I found the perfect way to apply it, I've been obsessed! I'd say it's around light to medium coverage and is absolutely buildable. It looks natural on the skin and really matches my skin better now that I use a brush instead of my fingers. I'll do a more in-depth review soon, but this has definitely been the base product I've reached for the most this month.


2. Sigma - F50 (Formerly SS 187) Duo Fibre Brush

It is thanks to this baby that I've fallen in love with the Revlon Beyond Natural foundation. But it works beautifully for other liquid face products as well. By stippling the product onto the skin and then blending it out, you achieve a gorgeous finish. Some say "airbrushed," but I've never used any airbrushing equipment on my face so I can't say for certain if that's the finish it achieves. But gorgeous is definitely a good word to describe the finish I achieve for myself.


3. Sleek MakeUP i-Divine Sunset Palette - Cranberry Shade

This entire palette is gorgeous; in fact, Sunset and Storm are probably 2 of Sleek's best palettes. But I've come to really enjoy this one shade in particular. I'm pretty sure it doesn't have a name, but it's a gorgeous red with a satiny finish. I've used it in two looks recently, one of which I posted yesterday. It's amazingly pigmented and the velvety texture allows it to blend quite easily. I never though I'd love a red eyeshadow, but there you go :p.


4. Lush - The Olive Branch Shower Gel


I've had this shower gel since the summer but I never used it until fall/winter rolled around. It just smells so amazingly warm that it feels more appropriate to use it when the weather's a bit chilly. No, it's not the most moisturizing of shower gels, nor is it a brilliant exfoliator; but it there's something so welcoming about it, especially when you shower with really warm water... That's why I love it so much!


5. Lush - Sympathy For The Skin Body Lotion

This lotion is definitely a staple for me in any season, but I've come to really  appreciate it this winter. Although it isn't technically winter yet, we experienced a period of below freezing weather and my skin has suffered for it. Sympathy for the Skin has kept my skin wonderfully moisturized; it retains moisture better and smells absolutely delicious. The combination of The Olive Branch and this lotion is especially glorious!


6. Lush - Angels On Bare Skin Cleanser

Angels on Bare Skin is really such a wonderful cleanser. It leaves my skin looking and feeling smoother and doesn't strip any moisture at all from my skin. Actually, I would feel comfortable saying it's moisturizing as well because I can get away with not applying moisturizer on my skin after using this product. Not only is it simple yet effective, it's also one of Lush's vegan products. It has natural ingredients and no parabens, sulfates, or any preservatives.


7. Nivea - Milk & Honey Lip Balm

Smells lovely (milk and honey? Come on!) and moisturizes just as well as my well-loved tinted lip conditioner from MAC. Also, it was less than $3. There is no losing with this lip balm! No fancy tricks here, but it's a very effective product. An more in-depth review is coming soon.


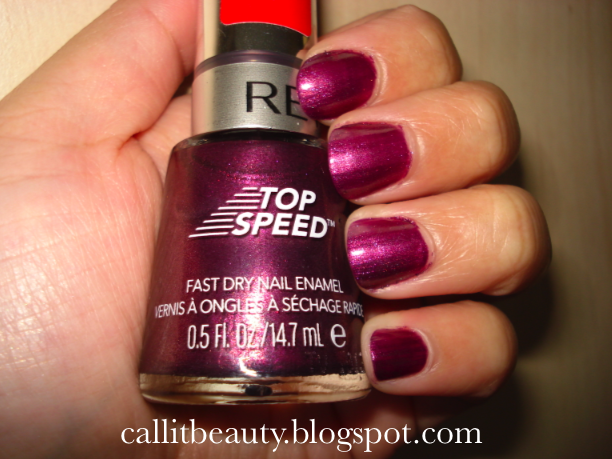
8. Revlon - Sugar Plum Nail Polish

Applies smoothly and effortlessly, plus it dries so incredibly quick! The shade is gorgeous, too. Perfect for the Holidays! 


Happy December, lovelies!
What were your favourites form last month?


READ MORE - Monthly Favourites - November 2010

Tuesday, November 30, 2010

All About Eyes - Red, Gold & Black


So this look was inspired by the theme of our Christmas tree this year: red, gold and black. The eyeshadow shades aren't an exact match for the ornaments, of course, I just made do with what I had.


Products Used:
Sleek Makeup i-Divine Palette - Storm (gold) & Sunset (yellow-gold, shimmery red, & matte black)
MAC Fluidline - Blacktrack
CoverGirl VolumeExact Mascara - Very Black


To start off, I applied the yellow-gold eyeshadow all over the lid and up to the brow bone; then I layered the gold eyeshadow on top to create the exact shade I wanted. Next, I applied the shimmery red eyeshadow to the outer corner of the eye, tapering it off at the end. This eyeshadow was also applied to the outer half of the lower lash line. Then I applied the gold combination on the lower lash line as well, making sure to blend it with the red seamlessly. Next, I took a fluffy eyeshadow brush to blend the upper edge out and soften any harsh edges. With Blacktrack Fluidline, I lined the upper lash line and lower water line. Lastly, I filled in any gaps in my brows with a matte black eyeshadow and applied a few coats of mascara to both the top and bottom lashes.


Hope you like this look :)


READ MORE - All About Eyes - Red, Gold & Black

Monday, November 8, 2010

All About Eyes - Jazzberry


Products Used:
Sleek MakeUP i-Divine Palette - Sunset (maroon shade)
Annabelle Cosmetics Mono Eyeshadow - Jazzberry
MAC Fluidline - Blacktrack
L'oréal Voluminous Mascara - Black


Another one of my "let's take two random colours and slap them together" looks :p.

So I started off with a maroon shade all over the lid and up to the brow bone. Next up, I applied Jazzberry (a muddy, purple colour) on the "outer v," starting from the outer third of the eye and applying the top part a little bit past the halfway point. Then I applied Blacktrack rather heavily on both the upper and lower lash line, as well as the lower water line. I also made sure to flick it out just a tad. Lastly, I applied a few coats of L'oréal Voluminous Mascara on both the upper and lower lashes.


Happy Monday, lovelies!


READ MORE - All About Eyes - Jazzberry

Thursday, October 28, 2010

All About Eyes - Halloween


To compliment my previous Halloween looks, I decided to create something that was more inspired by Halloween instead of for Halloween. Of course, you can still make this look work for a Halloween costume if you want :).


Products Used:
MAC Paint Pot - Soft Ochre
Sleek MakeUP i-Divine Palette - Circus (matte orange & matte black) and Sunset (shimmery orange)
MAC Fluidline - Blacktrack
Tarte Lights, Camera, Splashes! Mascara - Black


First, I applied a paint pot all over the lid to neutralize the darkness of my lids. Then I applied the matte orange eyeshadow all over the lid past the crease and up to the brow bone. I used Sigma's E55 eye shading brush and applied with a patting motion to deposit more colour.


Next, I used Sigma's E70 medium angled shading brush to apply the matte black eyeshadow to the outer corner and lower lash line; making sure to flick out the outer edge. I chose this brush because I wanted the bottom lash line to be kind of messy looking; to have more of a grungy look instead of a precise line.


In keeping with the "messy look," I used the same brush to apply the top black line. I started from the inner corner (on top of the matte orange) and curved it under my brows and flicked it up past my eyebrows. I also added some matte orange to the outer corner to create a flick of colour on top of the black.


Next, I applied a shimmery orange eyeshadow right below the top black line. Again, starting from the inner corner, curving below the brow and then flicking up past it. Afterwards, I took MAC's Blacktrack Fluidline to line the upper lash line and lower waterline. A few coats of mascara and the look was done!


Hope you guys like this look!
Let me know what your Halloween look will be :)


READ MORE - All About Eyes - Halloween

Tuesday, October 26, 2010

Call It Beauty Does Halloween - Born In The 80's


Ahh, the 80s, with your big hair and garish makeup. Despite being supremely thankful I didn't have to go through my teens in the 80s, I must say I have a soft spot for that decade. So here's my take on the 80s look.

Products Used:
Revlon PhotoReady Foundation - Shell
bareMinerals Foundation - Light
MAC Studio Finish Concealer - NW25
MAC Paint Pot - Soft Ochre
Annabelle Cosmetics Mono Eyeshadow - Revolver
Sleek MakeUP i-Divine Palette (Circus) - Purple, Pink & Matte Black
Tarte Lights, Camera, Splashes! Mascara - Black
MAC Blush Ombre - Vintage Grape
MAC Mineralize Skinfinish - Petticoat
Sephora Eye Shadow - Aspen Summit No23
Revlon Colorburst Lipstick - Fuchsia


Since I was in an experimental mood, I decided to mix some mineral powder (bareMinerals - Light) and liquid foundation (Revlon PhotoReady - Shell) together to get a better shade match for my skin (Shell is too light). I just mixed them together on the back of my hand and applied the foundation to my face with a Sigma F60 Foundation Brush.


For the eyes, I started off by applying Soft Ochre Paint Pot all over the lid. Then, I applied Annabelle Cosmetics' Revolver eyeshadow on the lid up to the crease and flicking out the outer edge.


Next, I applied a shimmery purple eyeshadow from Sleek MakeUP's Circus palette on top of Revolver. This eyeshadow starts a bit further in the inner corner than Revolver. Again, this eyeshadow flicks out in the outer corner.


Then, I applied the shimmery pink eyeshadow from Sleek's Circus palette from the inner corner up arching up to the brow bone, as seen in the photo above. Afterwards, I blended some Aspen Summit eyeshadow from Sephora to the brow bone to give a bit more shimmer to the eye. 


To finish up the eyes, I used some matte black eyeshadow to line the upper and lower lash lines, as well as the lower water line. After applying a few coats of mascara, the eyes were done.


For the cheeks, I first applied MAC's Blush Ombre in Vintage Grape very heavily to the back of the cheek. To add a bit of shimmer, I layered MAC's Petticoat MSF on top of Vintage Grape and applied Sephora's Aspen Summit eyeshadow to the cheek bone. The more garish, the better :p.


Lastly, I applied Revlon Colorburst Lipstick in Fuchsia straight from the tube. The 80s were about bright lipsticks, so this shade was absolutely perfect. 


And now for the finished look:


Hope you guys like this look!


READ MORE - Call It Beauty Does Halloween - Born In The 80's
Related Posts Plugin for WordPress, Blogger...